
RIDE SKILLS: ADVANCED FLAT CORNERING
Rory Bingham, Onward MTB Coaching
For this month’s Ride Skills article, we’ll look at a technique to find more security and confidence in flat corners.
Flat corners can be a nemesis for riders. This technique will improve your stability, and ability to drive the bike through the turn with better traction so you can find your inner Kovarik or Sam Hill.
Set yourself up for success
Some of the fundamentals we have covered to date really come into play here. As you arrive at a flat corner, we need to check off a few things to improve our control. These are especially important when you’re acquiring new skills in flat corners.
- Speed control: Scrub your speed early—enter slow, exit fast. Do your best to leave the brakes alone during flat corners, because we don’t want to add braking forces into an already complex physics equation of maintaining traction. Arriving at a manageable speed will help you stay on your desired line through the turn.
- Position: Hinge at the hips and get that chest a bit lower. We want to increase the mobility in our arms so we can bend and extend them to lean the bike under us. Being lower gets our centre of gravity a bit lower, which is more stable, too.
- Line: Choose lines that open flat turns up and create a bigger turn radius. You’ll have more time, and you can make smoother movements to carry flow and exit speed.

Cornering: The techniques
Corners are hard because there are several techniques that all need to be sequenced in correct order, at the right time, and in the right amount. This becomes even harder when our support is taken away from us i.e. in flat corners.
Most corners need different amounts of steering, leaning, and rotating movements. We’re going to focus on the last of those three so we can zone in on finding more stability and grip, hopefully giving you another tool for your flat-corner toolbox.
Rotating: What it is and why we use it.
Rotating, is twisting your body so that it faces ahead, or “leads” the bike in the turn. In flat turns, we can’t rely on the support of a berm to give us grip—we need to proactively create grip where it isn’t.
It’s more stable because your mass shifts towards the outside of the bike and stays on more top of the contact patch of your tyres. This also creates more room to tip the bike underneath you, engaging the side knobs of the tyre to find more grip. From here, you can easily adjust how much you lean the bike depending on how scarce grip is, or how tight the turn is.
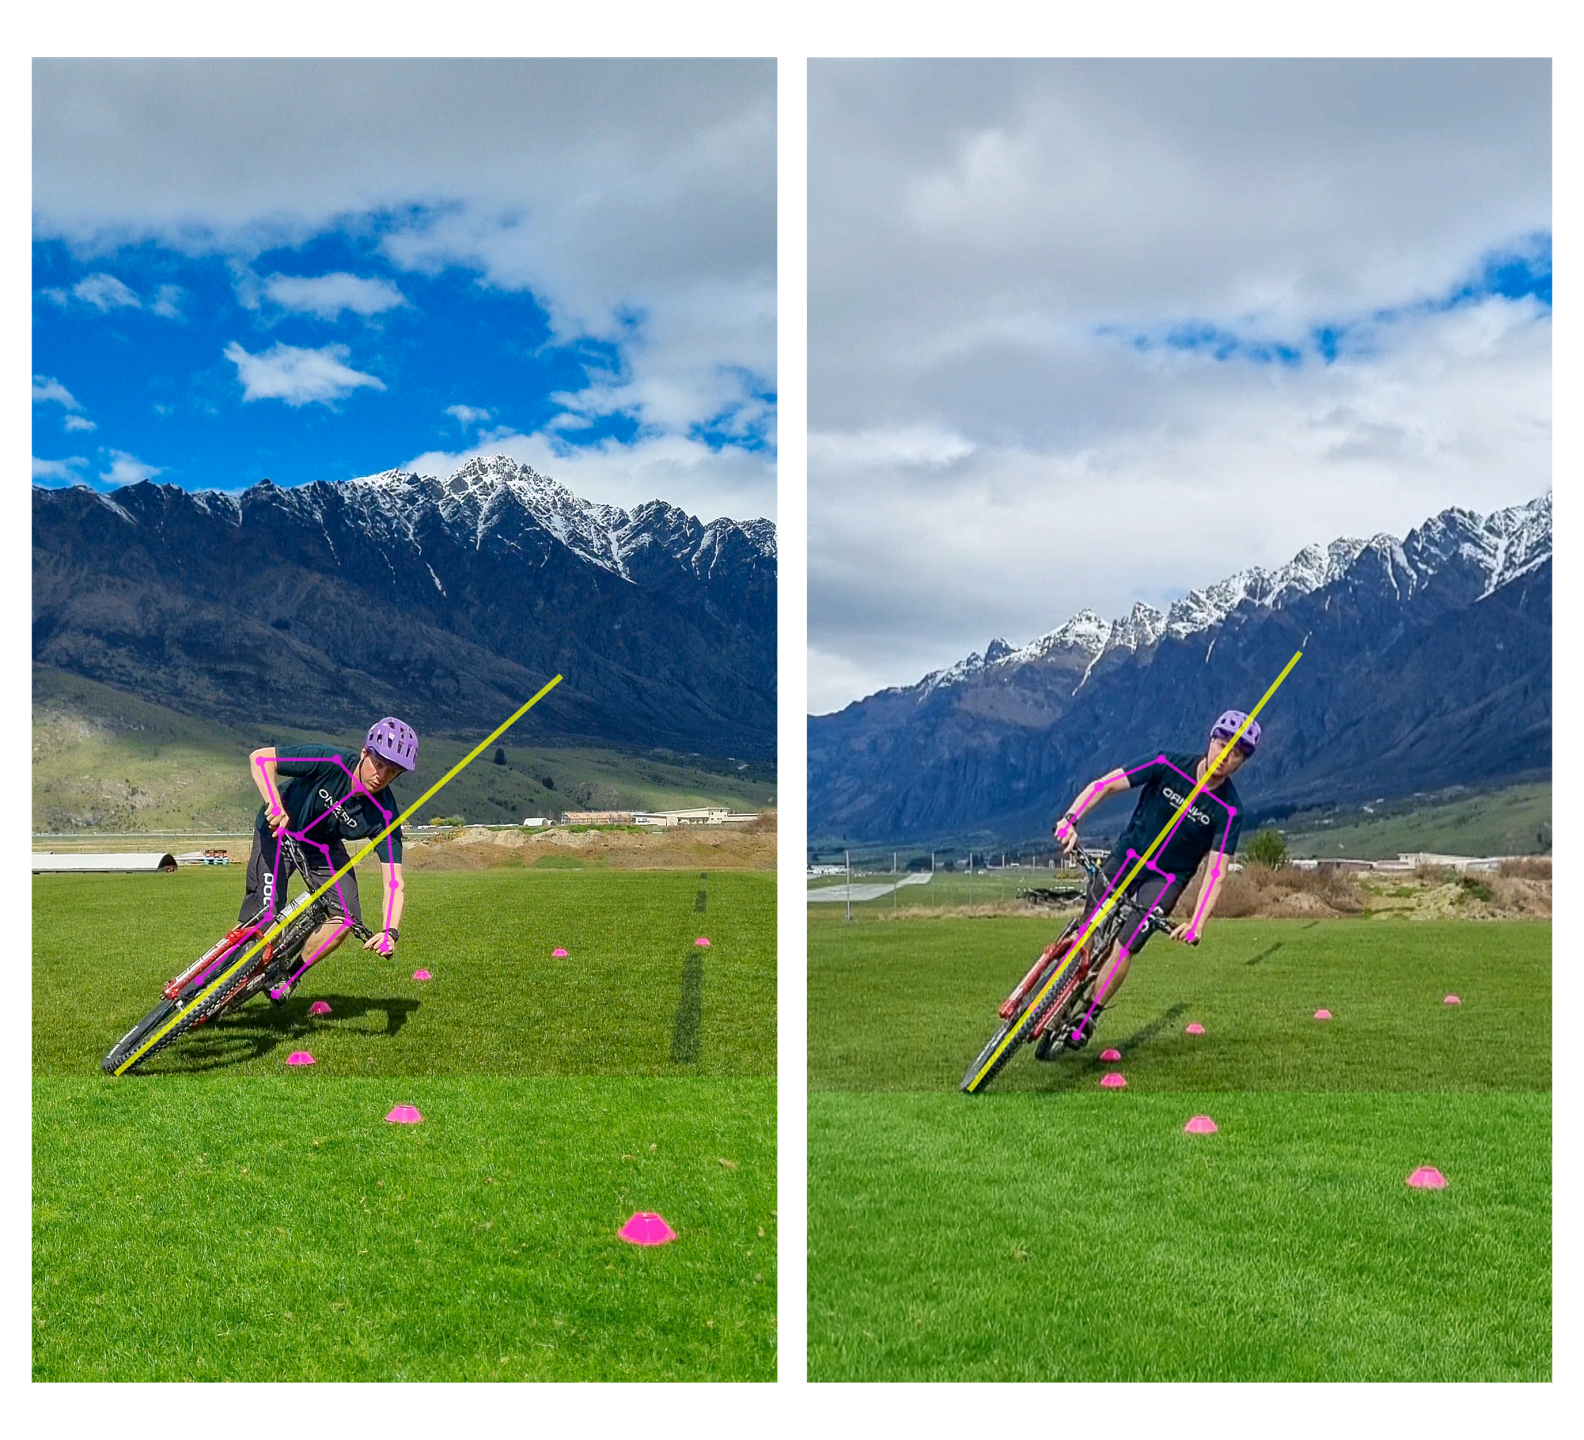
See the above example. On one side I’m fully rotated, lower and leaning the bike more. On the other, I’m just leaning with the bike and staying tall. The yellow line shows the lean angle of the bike. Notice how my body is distributed around this intersecting line—about 80 per cent of my body is “outside” the bike on the left, while it’s 50:50 on the right.
The more I lean with the bike as one unit, the further my mass gets away from my base of support and I become increasingly unstable. I probably couldn’t get much more lean angle out of the bike if I kept leaning this way.
This is where rotation enters the mix. It’s a great tool when we need to find a way to “separate” ourselves from the bike to stay stable and keep our tyres gripping. I’m no ski coach but watch a slalom skier and it’s no coincidence that the movements are similar.
How to rotate better
Rotation, especially in the amounts I am demonstrating, requires a high degree of bike/body separation. Quality rotating movements rely on a rider to have already consolidated a low, centred position on the bike and an ability to lean the bike underneath them (since they are closely linked).
When initiating rotating movements, I like to focus on the knees—twisting both knees in unison to the exit of the turn. This gets more of your body linked into the movement.
You’ll feel your feet, knees, hips and torso collectively engaged in this rotational plane as a cohesive unit. Imagine you have flashlights on your knees, and you need to move them together to illuminate the path ahead. Or think about getting your outside kneecap into the top tube of the bike. You may feel your feet shifting around a little inside your shoe, too—this is a good sensation to aim for, just make sure you keep your shoe on the pedal!
Structuring your practice
Find a grassy field with a gentle gradient and get practicing. Remember, get your position low and mobile first. To introduce this movement, rotate your knees around the bike to initiate gentle sweeping turns. You’ll find your bike wants to start turning naturally—that’s fine, let it happen.
If you find your hips moving laterally around the outside of the bike, you’re doing it well. Imagine your hips are connected to your stem with a piece of string. Your hips should be creating almost a pendulum-like movement around the stem, sweeping from side to side around the bike.
Develop this by trying to rotate more or less, depending on the tightness of the turn or the amount of support you have in the turn. Another idea is to explore how it links to leaning the bike under you—see if you can lean the bike more from a rotated position.
When you feel comfortable, take it to the trail and use it in some turns. I really like using this early, before the turn, to set myself up and get more of my turning done early. It’s also awesome for maintaining direction and grip on off camber sections, too. In the early stages, try to make your movements smooth and fluid to avoid any sudden mishaps.
Key points
- Find more stability, drive and traction by rotating your body ahead of the bike in the turn, or towards the exit.
- Focus the initiation of the movement from the knees, to engage more of the body in a rotational plane.
- Ensure you’re already comfy with the fundamentals of being mobile, centred and lower on the bike first.
To drop or not to drop?
Should you drop your outside foot?
There are pros and cons to this age-old cornering theory. The pro is that you create more clearance to the lean the bike over more. This can be helpful to find more grip, or for tighter radius turns.
The cons are that it can be inefficient on turns where we don’t need to lean the bike over much (e.g. big bike park berms). It also increases the cognitive load on the rider, especially when learning it. Lastly, it’s easier to pump corners with level pedals—a more symmetrical lower body gives access to quicker, more powerful pumping movements.
I like to keep this technique for advanced riders and employ it more as “degrees of movement” on a dial, not as two pedal positions (level, or dropped). This produces a much more useful and adaptable tool for the rider to make choices on the trail.
I’ve been focusing more lately on using the outside ankle as an “anchor”. Wherever your crank arm is, drop the anchor by dropping your outside heel. The “anchor” gives more strength and structure to that outside leg and engages it to feel like your outside foot is securely driving the bike. It doesn’t need to be stiff—you can still manage bumps and inputs by flexing the ankle joint.
I’m Rory, head coach and owner of Onward MTB Coaching. I’ve been coaching for 8 years and a passionate rider/massive bike nerd for 20+ years. Based in Queenstown, we strive to offer the finest coaching experience in New Zealand. We’re proud to work with elite to beginner riders of all ages to improve their riding to meet their goals. I am sponsored by POC Sports and RAAW Mountain Bikes.